Panimula
Sa isang nakaraang serye ng mga blogpost
- Mag-install ng Pi OS
- Qt 5.15 cross compile para sa Raspberry Compute Module 4 sa Ubuntu 20 LTS.
- I-configure ang Qt Creator sa Ubuntu 20 LTS para sa Cross-Compile
Isinulat ko ang tungkol sa pag install ng Raspbian sa Raspberry Compute Module at pag setup ng cross compilation para sa QtCreator sa Ubuntu 20.
Ang blogpost na ito ay isang update sa - sa oras na ito - pinakabagong bersyon 6.8 ng Qt, raspi OS Bookworm at Ubuntu 22.04 LTS.
Mga Kinakailangan
Ginamit ko ang sumusunod na hard- at software:
*Raspberry Pi 4
*raspi OS Bookworm, nang walang inirerekomendang software
*Ubuntu 22.04 LTS
*Qt 6.8
*QtCreator 14.02
Mga Tala
Kung mayroon kang isang laptop o desktop computer na may sapat na RAM at CPU cores, maaari mong gawin ang cross compilation sa isang virtual machine. Ngunit ginawa ko ang karanasan, na ang isang katutubong computer ay mas mabilis at gumagawa ng mas kaunting mga error.
Magkaroon ng isang pagtingin sa mga landas ng file at ip address sa aking mga halimbawa ng code at ayusin ang mga ito sa iyong mga pangangailangan.
Setup prambuwesas Pi
- Download raspiOS mula sa https://www.raspberrypi.com/software/operating-systems
- 2024-07-04-raspios-bookworm-arm64.img.xz: 64bit sa Raspberry Pi OS na may desktop (hindi sa inirerekomendang Software)
- Flash image sa SD-card na may Balena Etcher
- Sundin ang pag-install at huwag kalimutan ang setting para sa remote connect (ssh)
- Kumonekta sa RPi gamit ang ssh -> sa aking kaso sa IP address na 192.168.2.167 at user pi -> mula sa iyong Ubuntu host
ssh pi@192.168.2.167- Mag-install ng kinakailangang software:
sudo apt-get install libboost-all-dev libudev-dev libinput-dev libts-dev libmtdev-dev libjpeg-dev libfontconfig1-dev libssl-dev libdbus-1-dev libglib2.0-dev libxkbcommon-dev libegl1-mesa-dev libgbm-dev libgles2-mesa-dev mesa-common-dev libasound2-dev libpulse-dev gstreamer1.0-omx libgstreamer1.0-dev libgstreamer-plugins-base1.0-dev gstreamer1.0-alsa libvpx-dev libsrtp2-dev libsnappy-dev libnss3-dev "^libxcb.*" flex bison libxslt-dev ruby gperf libbz2-dev libcups2-dev libatkmm-1.6-dev libxi6 libxcomposite1 libfreetype6-dev libicu-dev libsqlite3-dev libxslt1-dev sudo apt-get install libavcodec-dev libavformat-dev libswscale-dev libx11-dev freetds-dev libsqlite3-dev libpq-dev libiodbc2-dev firebird-dev libxext-dev libxcb1 libxcb1-dev libx11-xcb1 libx11-xcb-dev libxcb-keysyms1 libxcb-keysyms1-dev libxcb-image0 libxcb-image0-dev libxcb-shm0 libxcb-shm0-dev libxcb-icccm4 libxcb-icccm4-dev libxcb-sync1 libxcb-sync-dev libxcb-render-util0 libxcb-render-util0-dev libxcb-xfixes0-dev libxrender-dev libxcb-shape0-dev libxcb-randr0-dev libxcb-glx0-dev libxi-dev libdrm-dev libxcb-xinerama0 libxcb-xinerama0-dev libatspi2.0-dev libxcursor-dev libxcomposite-dev libxdamage-dev libxss-dev libxtst-dev libpci-dev libcap-dev libxrandr-dev libdirectfb-dev libaudio-dev libxkbcommon-x11-dev gdbserver- Gumawa ng folder para sa Qt 6 installation:
sudo mkdir /usr/local/qt6- Tuklasin ang mga bersyon ng gcc, ld at ldd. Source code ng parehong bersyon ay dapat na download upang bumuo ng cross compiler mamaya.
pi@raspberrypi:~ $ gcc --version
gcc (Debian 12.2.0-14) 12.2.0
Copyright (C) 2022 Free Software Foundation, Inc.
This is free software; see the source for copying conditions.  There is NO
warranty; not even for MERCHANTABILITY or FITNESS FOR A PARTICULAR PURPOSE.

pi@raspberrypi:~ $ ld --version
GNU ld (GNU Binutils for Debian) 2.40
Copyright (C) 2023 Free Software Foundation, Inc.
This program is free software; you may redistribute it under the terms of
the GNU General Public License version 3 or (at your option) a later version.
This program has absolutely no warranty.

pi@raspberrypi:~ $ ldd --version
ldd (Debian GLIBC 2.36-9+rpt2+deb12u8) 2.36
Copyright (C) 2022 Free Software Foundation, Inc.
This is free software; see the source for copying conditions.  There is NO
warranty; not even for MERCHANTABILITY or FITNESS FOR A PARTICULAR PURPOSE.
Written by Roland McGrath and Ulrich Drepper.- I-append ang sumusunod na piraso ng code sa dulo ng ~/.bashrc at i-update ang mga pagbabago:
export LD_LIBRARY_PATH=$LD_LIBRARY_PATH:/usr/local/qt6/lib/
source ~/.bashrc
Setup Ubuntu 22.04 LTS
- Update sa pinakabagong mga bersyon ng mga pakete ng software:
sudo apt update
sudo apt upgrade- I-install ang sumusunod na mga pakete:
sudo apt-get install make build-essential libclang-dev ninja-build gcc git bison python3 gperf pkg-config libfontconfig1-dev libfreetype6-dev libx11-dev libx11-xcb-dev libxext-dev libxfixes-dev libxi-dev libxrender-dev libxcb1-dev libxcb-glx0-dev libxcb-keysyms1-dev libxcb-image0-dev libxcb-shm0-dev libxcb-icccm4-dev libxcb-sync-dev libxcb-xfixes0-dev libxcb-shape0-dev libxcb-randr0-dev libxcb-render-util0-dev libxcb-util-dev libxcb-xinerama0-dev libxcb-xkb-dev libxkbcommon-dev libxkbcommon-x11-dev libatspi2.0-dev libgl1-mesa-dev libglu1-mesa-dev freeglut3-dev build-essential gawk git texinfo bison file wget libssl-dev gdbserver gdb-multiarch libxcb-cursor-devBumuo ng pinakabagong bersyon ng cmake mula sa pinagmulan:
cd ~
wget https://github.com/Kitware/CMake/releases/download/v3.30.5/cmake-3.30.5.tar.gz
tar -xzvf cmake-3.30.5.tar.gz
cd cmake-3.30.5
./bootstrap
make -j$(nproc)
sudo make install
# Update PATH Environment Variable
which cmake
/usr/local/bin/cmake
export PATH=/usr/local/bin/cmake:$PATH
source ~/.bashrc
cmake --version
Bumuo ng gcc bilang isang cross compiler
Download kinakailangang source code. Dapat mong baguhin ang mga sumusunod na utos sa iyong mga pangangailangan. Para sa oras na ginagawa ko ang pahinang ito, ang mga ito ay:
- GCC 12.2.0
- Binutils 2.40(Bersyon ng LD)
- Glibc 2.36(Bersyon ng LD)
cd ~
mkdir gcc_all && cd gcc_all
wget https://ftpmirror.gnu.org/binutils/binutils-2.40.tar.bz2
wget https://ftpmirror.gnu.org/glibc/glibc-2.36.tar.bz2
wget https://ftpmirror.gnu.org/gcc/gcc-12.2.0/gcc-12.2.0.tar.gz
git clone --depth=1 https://github.com/raspberrypi/linux
tar xf binutils-2.40.tar.bz2
tar xf glibc-2.36.tar.bz2
tar xf gcc-12.2.0.tar.gz
rm *.tar.*
cd gcc-12.2.0
contrib/download_prerequisites- Gumawa ng folder para sa compiler installation.
sudo mkdir -p /opt/cross-pi-gcc
sudo chown $USER /opt/cross-pi-gcc
export PATH=/opt/cross-pi-gcc/bin:$PATH- Kopyahin ang mga header ng kernel sa folder sa itaas.
cd ~/gcc_all
cd linux
KERNEL=kernel7
make ARCH=arm64 INSTALL_HDR_PATH=/opt/cross-pi-gcc/aarch64-linux-gnu headers_install- Bumuo ng mga binutil.
cd ~/gcc_all
mkdir build-binutils && cd build-binutils
../binutils-2.40/configure --prefix=/opt/cross-pi-gcc --target=aarch64-linux-gnu --with-arch=armv8 --disable-multilib
make -j 8
make install- I-edit ang gcc-12.2.0/libsanitizer/asan/asan_linux.cpp. Magdagdag ng sumusunod na piraso ng code.
#ifndef PATH_MAX
#define PATH_MAX 4096
#endif- Gawin ang partial build ng gcc.
cd ~/gcc_all
mkdir build-gcc && cd build-gcc
../gcc-12.2.0/configure --prefix=/opt/cross-pi-gcc --target=aarch64-linux-gnu --enable-languages=c,c++ --disable-multilib
make -j8 all-gcc
make install-gcc- Bahagyang itayo ang Glibc.
cd ~/gcc_all
mkdir build-glibc && cd build-glibc
../glibc-2.36/configure --prefix=/opt/cross-pi-gcc/aarch64-linux-gnu --build=$MACHTYPE --host=aarch64-linux-gnu --target=aarch64-linux-gnu --with-headers=/opt/cross-pi-gcc/aarch64-linux-gnu/include --disable-multilib libc_cv_forced_unwind=yes
make install-bootstrap-headers=yes install-headers
make -j8 csu/subdir_lib
install csu/crt1.o csu/crti.o csu/crtn.o /opt/cross-pi-gcc/aarch64-linux-gnu/lib
aarch64-linux-gnu-gcc -nostdlib -nostartfiles -shared -x c /dev/null -o /opt/cross-pi-gcc/aarch64-linux-gnu/lib/libc.so
touch /opt/cross-pi-gcc/aarch64-linux-gnu/include/gnu/stubs.h- Bumalik sa GCC.
cd ~/gcc_all/build-gcc
make -j8 all-target-libgcc
make install-target-libgcc- Tapusin ang pagtatayo ng glibc.
cd ~/gcc_all/build-glibc
make -j8
make install- Tapusin ang pagtatayo ng gcc.
cd ~/gcc_all/build-gcc
make -j8
make install
Sa puntong ito, mayroon kaming isang buong cross compiler toolchain na may gcc. Ang folder gcc_all ay hindi na kailangan pa. Pwede mo na itong tanggalin.</:code19:></:code18:></:code17:></:code16:></:code15:></:code14:></:code13:></:code12:></:code11:></:code10:></:code9:></:code8:></:code7:>
Pagbuo ng Qt6
Mayroong dalawang posibilidad upang bumuo ng Qt6. Mayroong isang "single" (https://download.qt.io/official_releases/qt/6.8/6.8.0/single/qt-everywhere-src-6.8.0.tar.xz) na bersyon upang i download, na naglalaman ng qtbase at lahat ng mga submodule. Ito ay napakabigat na bagay at nangangailangan ng maraming kapangyarihan at oras upang buuin ito.
Ang aking rekomendasyon ay, upang buuin ang qtbase bilang batayan at pagkatapos ay buuin lamang ang bawat submodule na kailangan mo nang hiwalay.
- Gumawa ng mga folder para sa sysroot at qt6. Ginagawa ko ang mga folder na ito sa aking workspace/qt-rpi-cross-compilation directory.
cd ~/workspace/qt-rpi-cross-compilation
mkdir rpi-sysroot rpi-sysroot/usr rpi-sysroot/opt
mkdir qt6 qt6/host qt6/pi qt6/host-build qt6/pi-build qt6/src- I-download ang QtBase source code
cd ~/workspace/qt-rpi-cross-compilation/qt6/src
wget https://download.qt.io/official_releases/qt/6.8/6.8.0/submodules/qtbase-everywhere-src-6.8.0.tar.xz
tar xf qtbase-everywhere-src-6.8.0.tar.xz
Bumuo ng Qt6 para sa host
cd ~/workspace/qt-rpi-cross-compilation/qt6/host-build/
cmake ../src/qtbase-everywhere-src-6.8.0/ -GNinja -DCMAKE_BUILD_TYPE=Release -DQT_BUILD_EXAMPLES=OFF -DQT_BUILD_TESTS=OFF -DCMAKE_INSTALL_PREFIX=$HOME/workspace/qt-rpi-cross-compilation/qt6/host
cmake --build . --parallel 8
cmake --install .
Ang mga binary ay nasa ~/workspace/qt-rpi-cross-compilation/qt6/host
Bumuo ng Qt6 para sa rpi
Kopyahin at i paste ang ilang mga folder mula sa rpi gamit ang rsync sa pamamagitan ng SSH.
cd ~
rsync -avz --rsync-path="sudo rsync" pi@192.168.2.167:/usr/include workspace/qt-rpi-cross-compilation/rpi-sysroot/usr
rsync -avz --rsync-path="sudo rsync" pi@192.168.2.167:/lib workspace/qt-rpi-cross-compilation/rpi-sysroot
rsync -avz --rsync-path="sudo rsync" pi@192.168.2.167:/usr/lib workspace/qt-rpi-cross-compilation/rpi-sysroot/usr
rsync -avz --rsync-path="sudo rsync" pi@192.168.2.167:/opt/vc workspace/qt-rpi-cross-compilation/rpi-sysroot/opt- Lumikha ng file na may pangalang toolchain.cmake in ~/workspace/qt-rpi-cross-compilation/qt6.
Kailangan mong ayusin ang linya na "set(TARGET_SYSROOT /home/factory/workspace/qt-rpi-cross-compilation/rpi-sysroot)" sa iyong kapaligiran.
cmake_minimum_required(VERSION 3.18)
include_guard(GLOBAL)

set(CMAKE_SYSTEM_NAME Linux)
set(CMAKE_SYSTEM_PROCESSOR arm)

# You should change location of sysroot to your needs.
set(TARGET_SYSROOT /home/factory/workspace/qt-rpi-cross-compilation/rpi-sysroot)
set(TARGET_ARCHITECTURE aarch64-linux-gnu)
set(CMAKE_SYSROOT ${TARGET_SYSROOT})

set(ENV{PKG_CONFIG_PATH} $PKG_CONFIG_PATH:${CMAKE_SYSROOT}/usr/lib/${TARGET_ARCHITECTURE}/pkgconfig)
set(ENV{PKG_CONFIG_LIBDIR} /usr/lib/pkgconfig:/usr/share/pkgconfig/:${TARGET_SYSROOT}/usr/lib/${TARGET_ARCHITECTURE}/pkgconfig:${TARGET_SYSROOT}/usr/lib/pkgconfig)
set(ENV{PKG_CONFIG_SYSROOT_DIR} ${CMAKE_SYSROOT})

set(CMAKE_C_COMPILER /opt/cross-pi-gcc/bin/${TARGET_ARCHITECTURE}-gcc)
set(CMAKE_CXX_COMPILER /opt/cross-pi-gcc/bin/${TARGET_ARCHITECTURE}-g++)

set(CMAKE_C_FLAGS "${CMAKE_C_FLAGS} -isystem=/usr/include -isystem=/usr/local/include -isystem=/usr/include/${TARGET_ARCHITECTURE}")
set(CMAKE_CXX_FLAGS "${CMAKE_C_FLAGS}")

set(QT_COMPILER_FLAGS "-march=armv8-a")
set(QT_COMPILER_FLAGS_RELEASE "-O2 -pipe")
set(QT_LINKER_FLAGS "-Wl,-O1 -Wl,--hash-style=gnu -Wl,--as-needed -Wl,-rpath-link=${TARGET_SYSROOT}/usr/lib/${TARGET_ARCHITECTURE} -Wl,-rpath-link=$HOME/qt6/pi/lib")

set(CMAKE_FIND_ROOT_PATH_MODE_PROGRAM NEVER)
set(CMAKE_FIND_ROOT_PATH_MODE_LIBRARY ONLY)
set(CMAKE_FIND_ROOT_PATH_MODE_INCLUDE ONLY)
set(CMAKE_FIND_ROOT_PATH_MODE_PACKAGE ONLY)
set(CMAKE_INSTALL_RPATH_USE_LINK_PATH TRUE)
set(CMAKE_BUILD_RPATH ${TARGET_SYSROOT})

include(CMakeInitializeConfigs)

function(cmake_initialize_per_config_variable _PREFIX _DOCSTRING)
  if (_PREFIX MATCHES "CMAKE_(C|CXX|ASM)_FLAGS")
    set(CMAKE_${CMAKE_MATCH_1}_FLAGS_INIT "${QT_COMPILER_FLAGS}")

    foreach (config DEBUG RELEASE MINSIZEREL RELWITHDEBINFO)
      if (DEFINED QT_COMPILER_FLAGS_${config})
        set(CMAKE_${CMAKE_MATCH_1}_FLAGS_${config}_INIT "${QT_COMPILER_FLAGS_${config}}")
      endif()
    endforeach()
  endif()


  if (_PREFIX MATCHES "CMAKE_(SHARED|MODULE|EXE)_LINKER_FLAGS")
    foreach (config SHARED MODULE EXE)
      set(CMAKE_${config}_LINKER_FLAGS_INIT "${QT_LINKER_FLAGS}")
    endforeach()
  endif()

  _cmake_initialize_per_config_variable(${ARGV})
endfunction()

set(XCB_PATH_VARIABLE ${TARGET_SYSROOT})

set(GL_INC_DIR ${TARGET_SYSROOT}/usr/include)
set(GL_LIB_DIR ${TARGET_SYSROOT}:${TARGET_SYSROOT}/usr/lib/${TARGET_ARCHITECTURE}/:${TARGET_SYSROOT}/usr:${TARGET_SYSROOT}/usr/lib)

set(EGL_INCLUDE_DIR ${GL_INC_DIR})
set(EGL_LIBRARY ${XCB_PATH_VARIABLE}/usr/lib/${TARGET_ARCHITECTURE}/libEGL.so)

set(OPENGL_INCLUDE_DIR ${GL_INC_DIR})
set(OPENGL_opengl_LIBRARY ${XCB_PATH_VARIABLE}/usr/lib/${TARGET_ARCHITECTURE}/libOpenGL.so)

set(GLESv2_INCLUDE_DIR ${GL_INC_DIR})
set(GLIB_LIBRARY ${XCB_PATH_VARIABLE}/usr/lib/${TARGET_ARCHITECTURE}/libGLESv2.so)

set(GLESv2_INCLUDE_DIR ${GL_INC_DIR})
set(GLESv2_LIBRARY ${XCB_PATH_VARIABLE}/usr/lib/${TARGET_ARCHITECTURE}/libGLESv2.so)

set(gbm_INCLUDE_DIR ${GL_INC_DIR})
set(gbm_LIBRARY ${XCB_PATH_VARIABLE}/usr/lib/${TARGET_ARCHITECTURE}/libgbm.so)

set(Libdrm_INCLUDE_DIR ${GL_INC_DIR})
set(Libdrm_LIBRARY ${XCB_PATH_VARIABLE}/usr/lib/${TARGET_ARCHITECTURE}/libdrm.so)

set(XCB_XCB_INCLUDE_DIR ${GL_INC_DIR})
set(XCB_XCB_LIBRARY ${XCB_PATH_VARIABLE}/usr/lib/${TARGET_ARCHITECTURE}/libxcb.so)

list(APPEND CMAKE_LIBRARY_PATH ${CMAKE_SYSROOT}/usr/lib/${TARGET_ARCHITECTURE})
list(APPEND CMAKE_PREFIX_PATH "/usr/lib/${TARGET_ARCHITECTURE}/cmake")- Ayusin ang mga ganap na simbolikong link
cd ~/workspace/qt-rpi-cross-compilation
wget https://raw.githubusercontent.com/riscv/riscv-poky/master/scripts/sysroot-relativelinks.py
chmod +x sysroot-relativelinks.py
python3 sysroot-relativelinks.py rpi-sysroot- Magtipon ng source code para sa rpi.
cd $HOME/workspace/qt-rpi-cross-compilation/qt6/pi-build
cmake ../src/qtbase-everywhere-src-6.8.0/ -GNinja -DCMAKE_BUILD_TYPE=Release -DINPUT_opengl=es2 -DQT_BUILD_EXAMPLES=OFF -DQT_BUILD_TESTS=OFF -DQT_HOST_PATH=$HOME/workspace/qt-rpi-cross-compilation/qt6/host -DCMAKE_STAGING_PREFIX=$HOME/workspace/qt-rpi-cross-compilation/qt6/pi -DCMAKE_INSTALL_PREFIX=/usr/local/qt6 -DCMAKE_TOOLCHAIN_FILE=$HOME/workspace/qt-rpi-cross-compilation/qt6/toolchain.cmake -DQT_QMAKE_TARGET_MKSPEC=devices/linux-rasp-pi4-aarch64 -DQT_FEATURE_xcb=ON -DFEATURE_xcb_xlib=ON -DQT_FEATURE_xlib=ON
cmake --build . --parallel 8
cmake --install .- Ipadala ang mga binary sa rpi.
rsync -avz --rsync-path="sudo rsync" $HOME/workspace/qt-rpi-cross-compilation/qt6/pi/* pi@192.168.2.167:/usr/local/qt6Configure QtCreator
Mag-set up ng mga Compiler
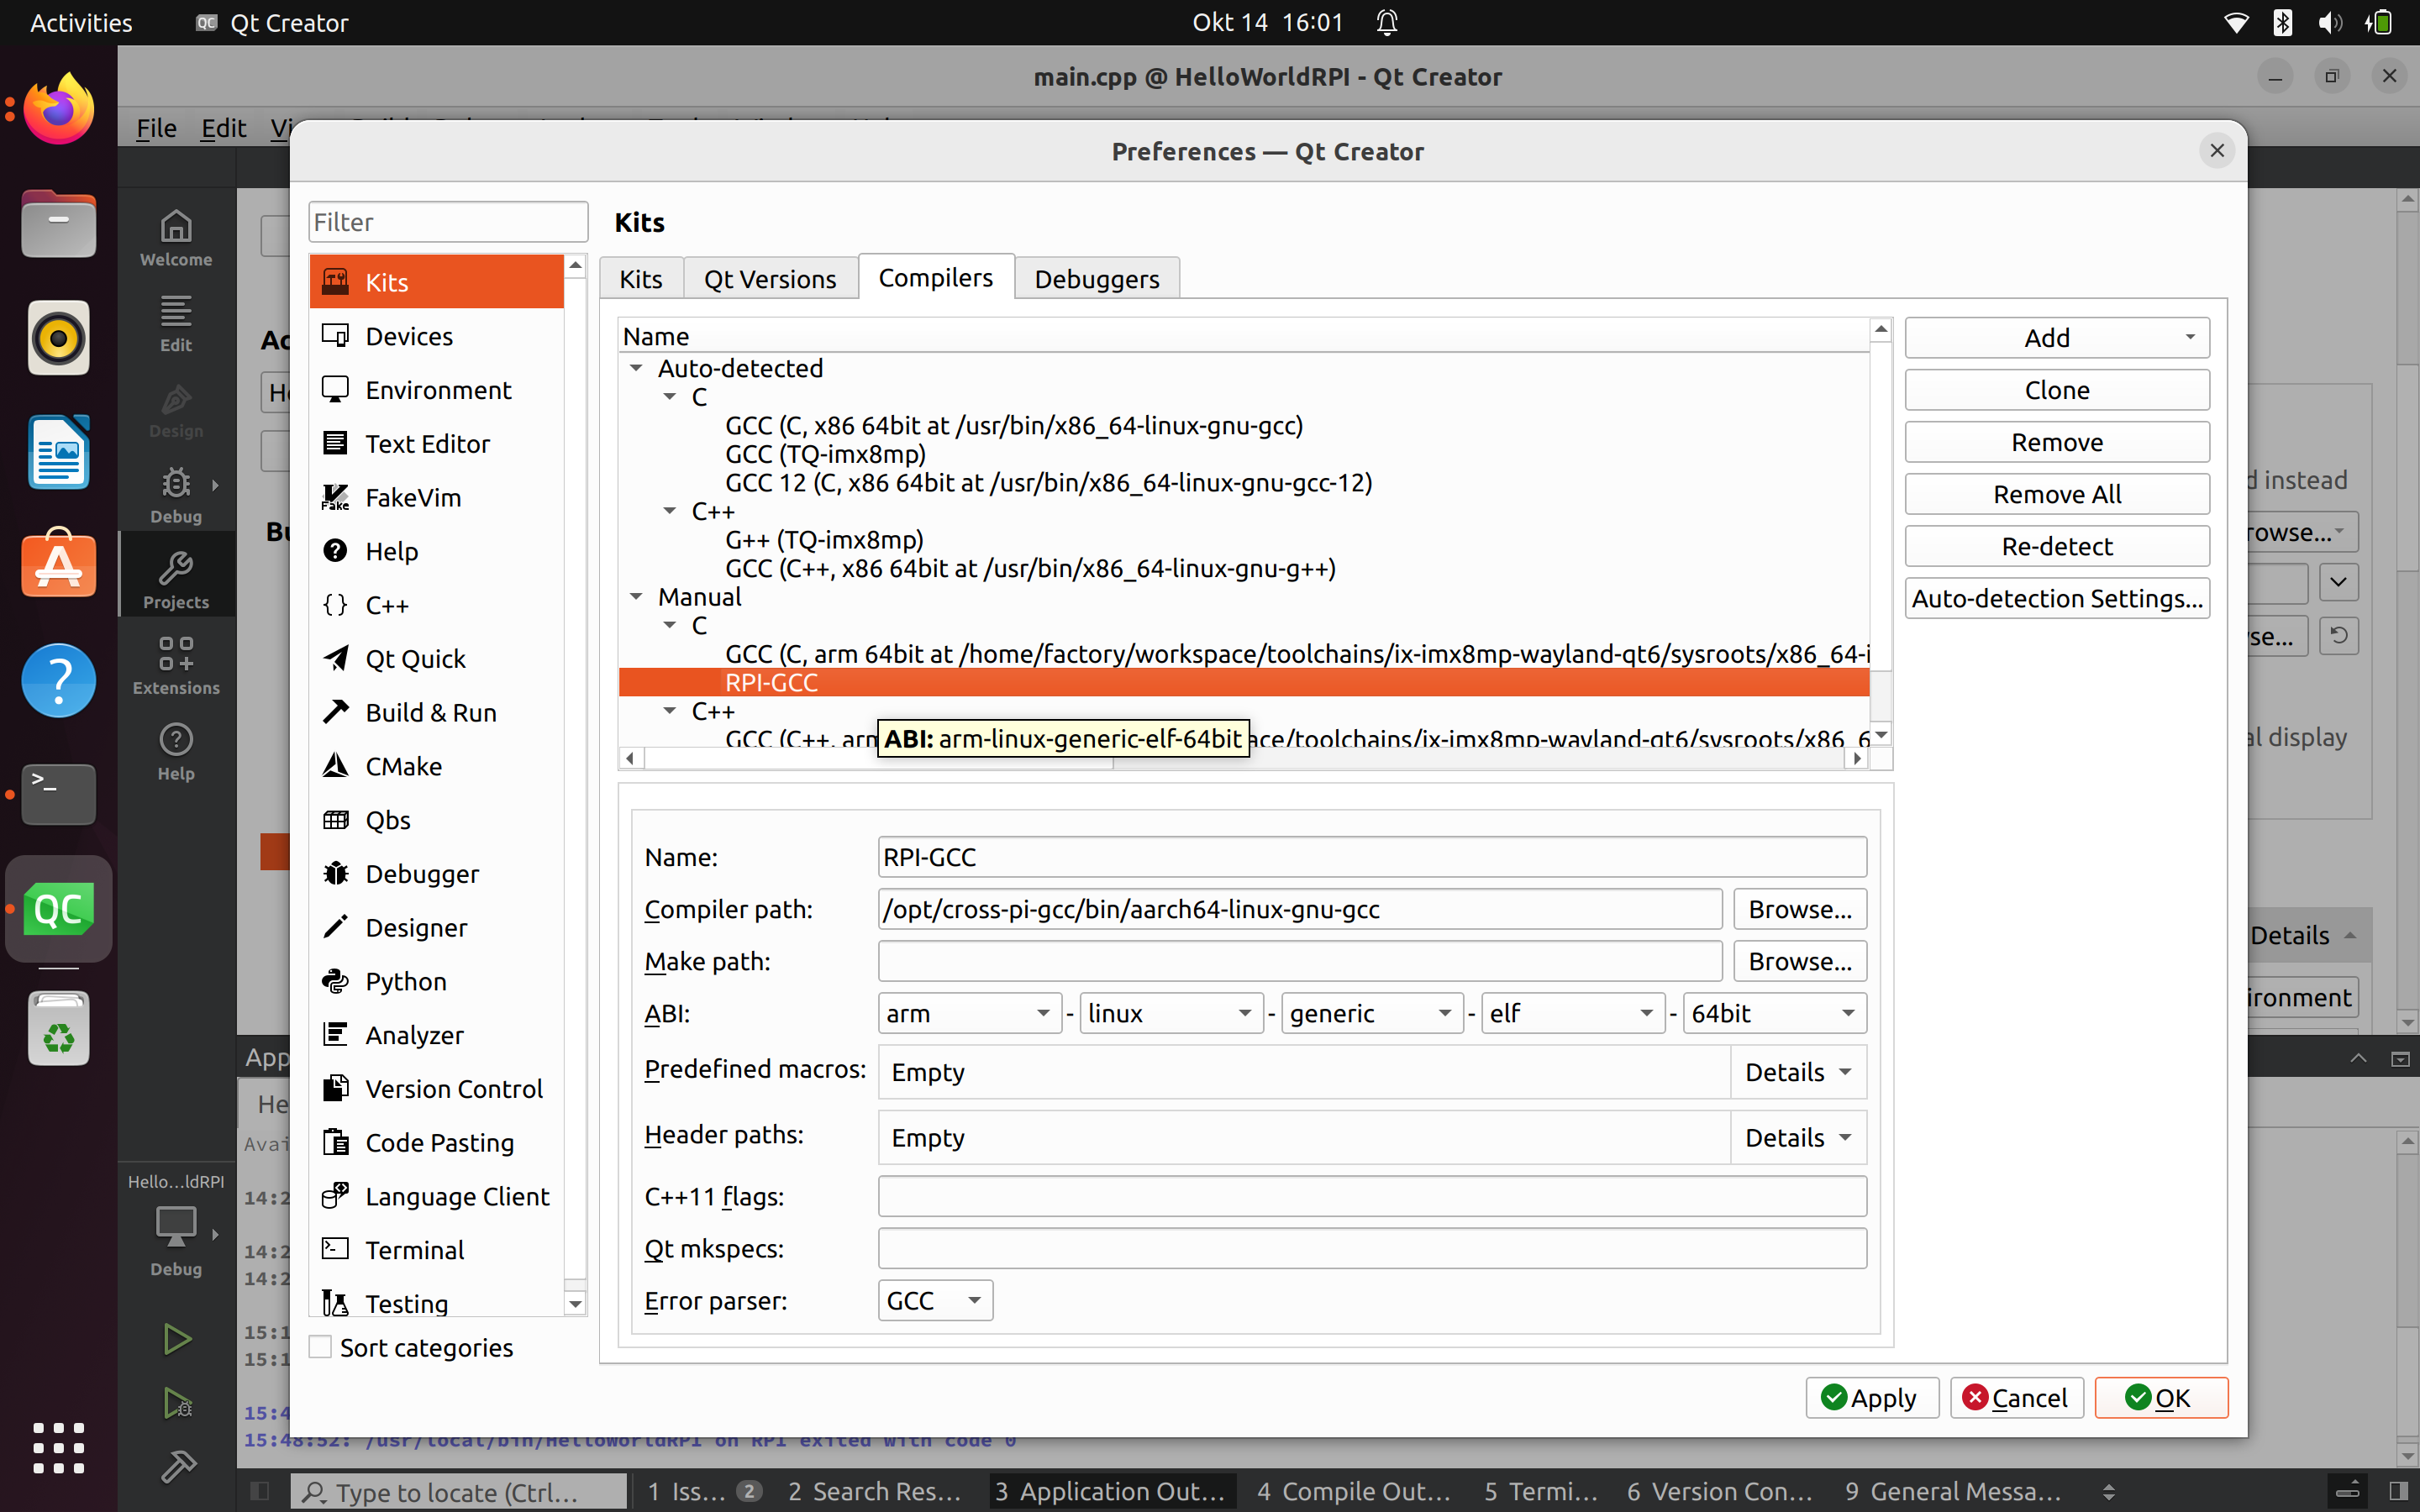
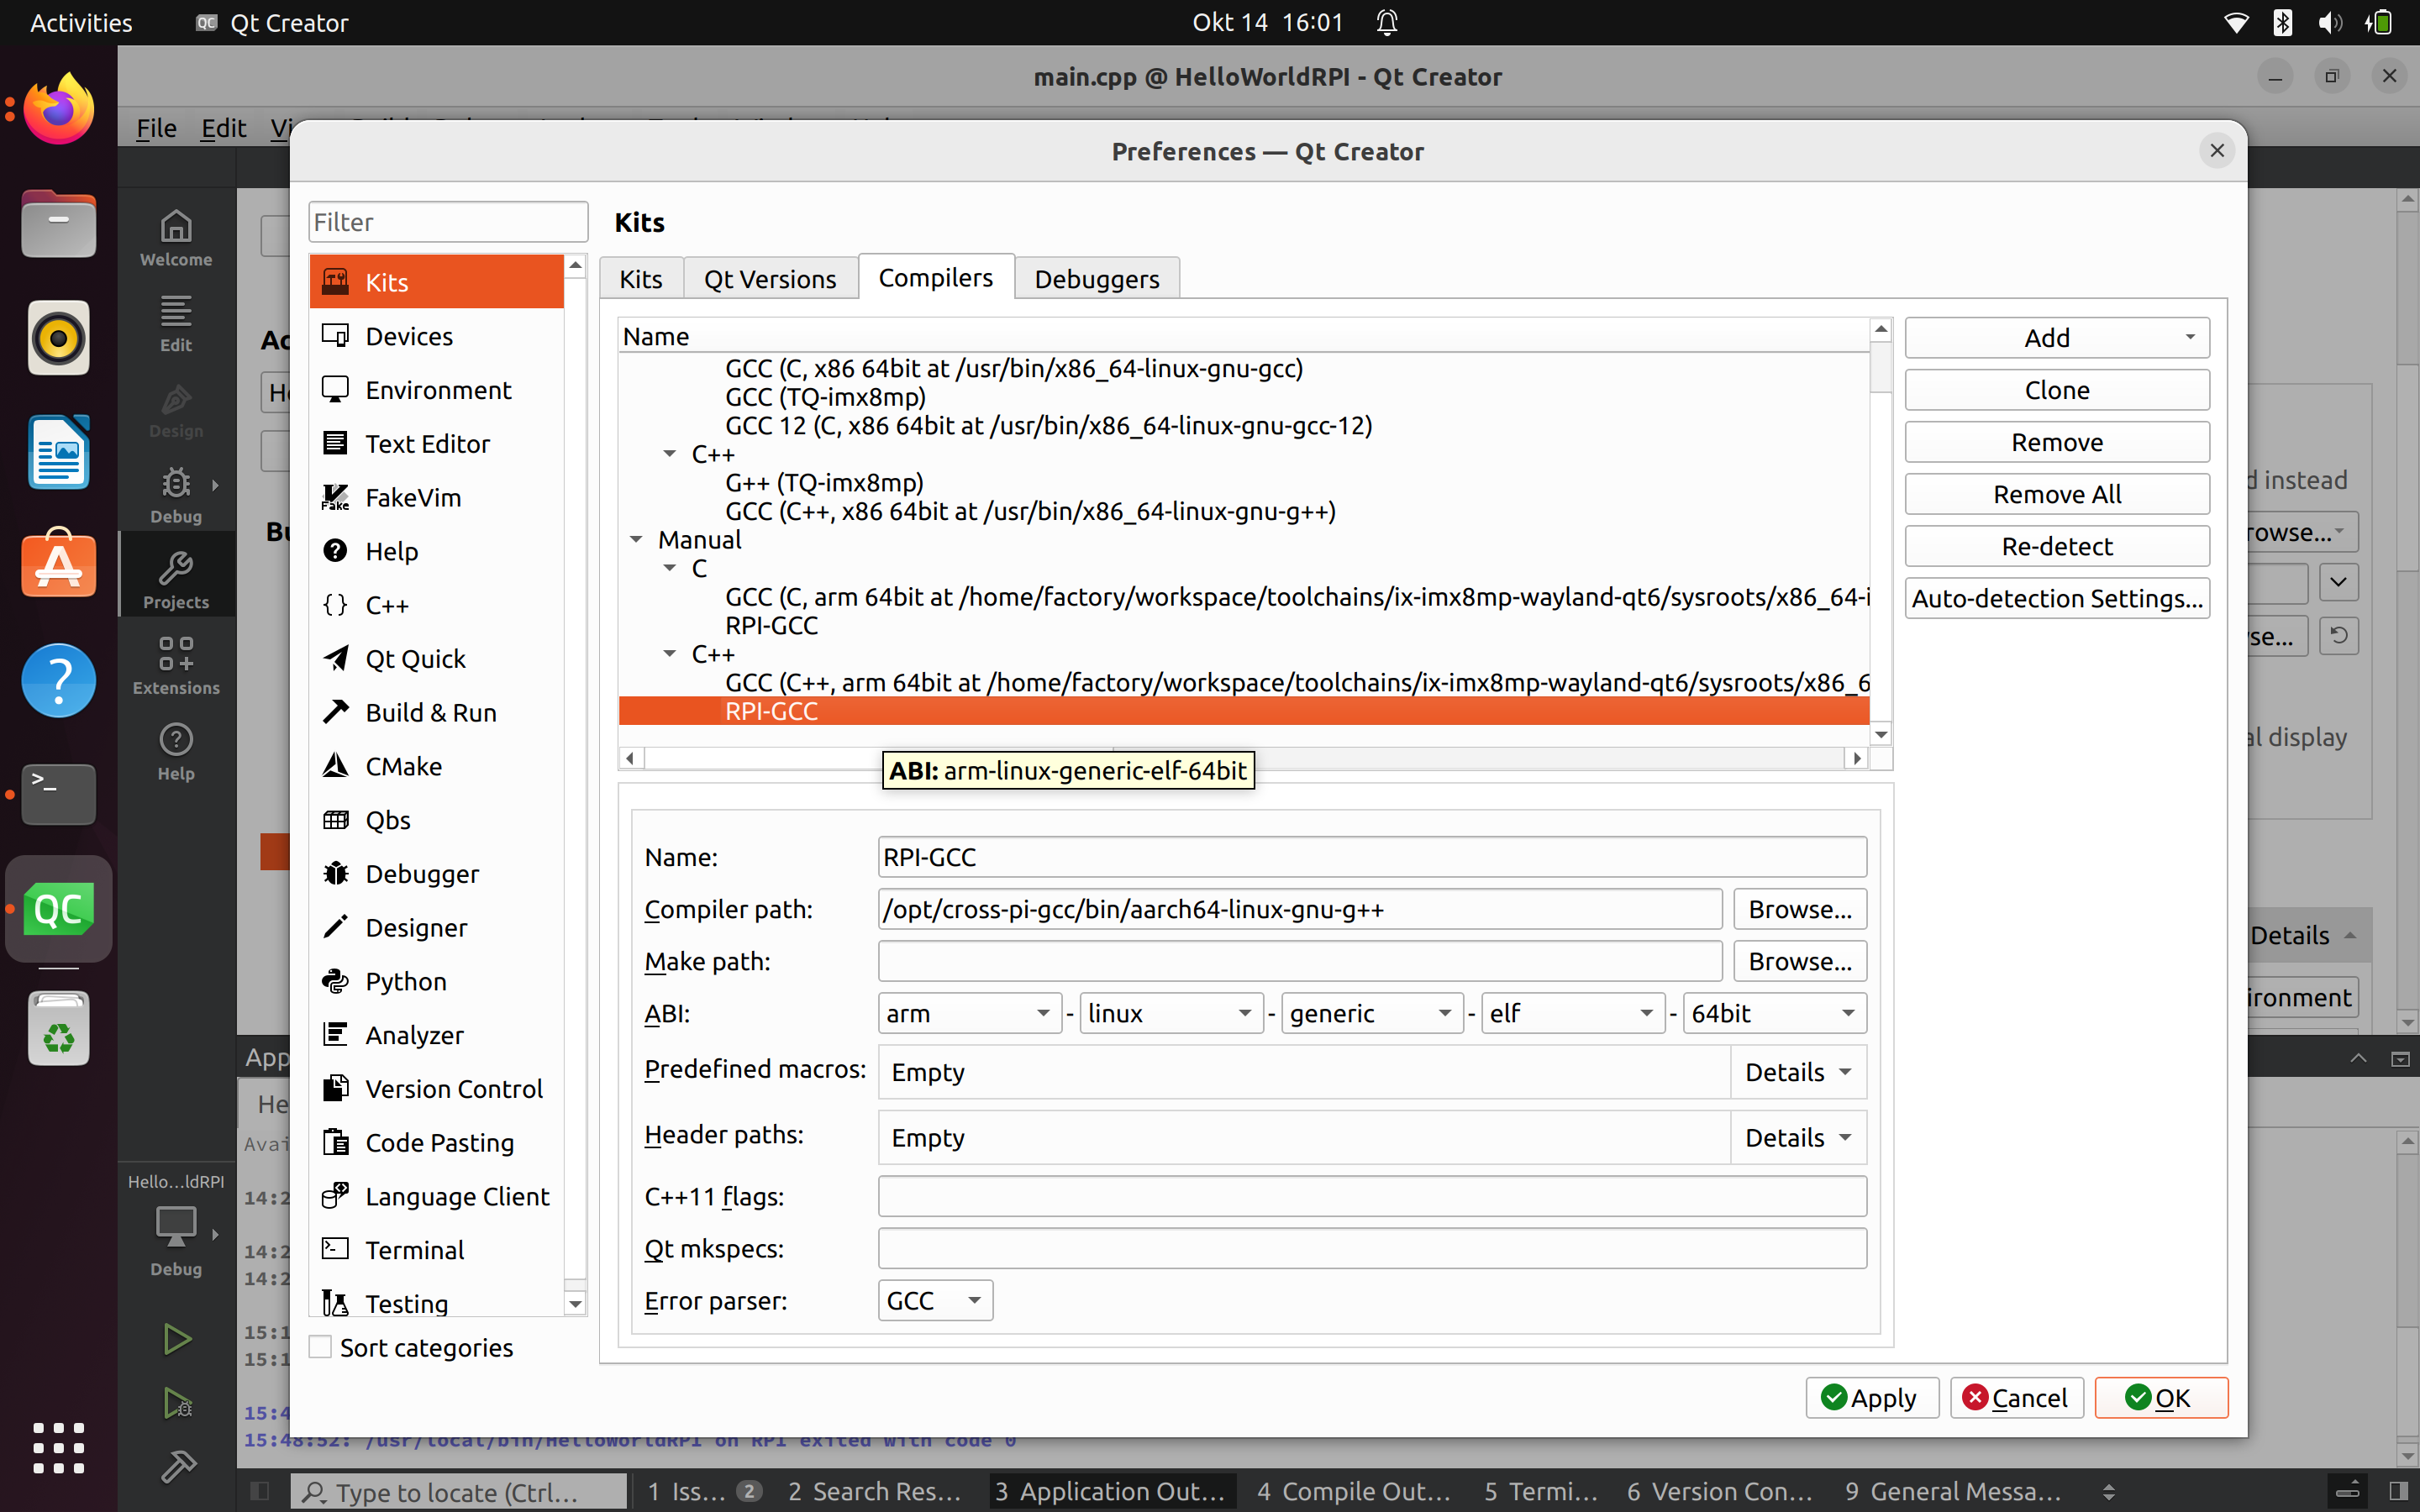
Mag-set up ng mga Debuggers
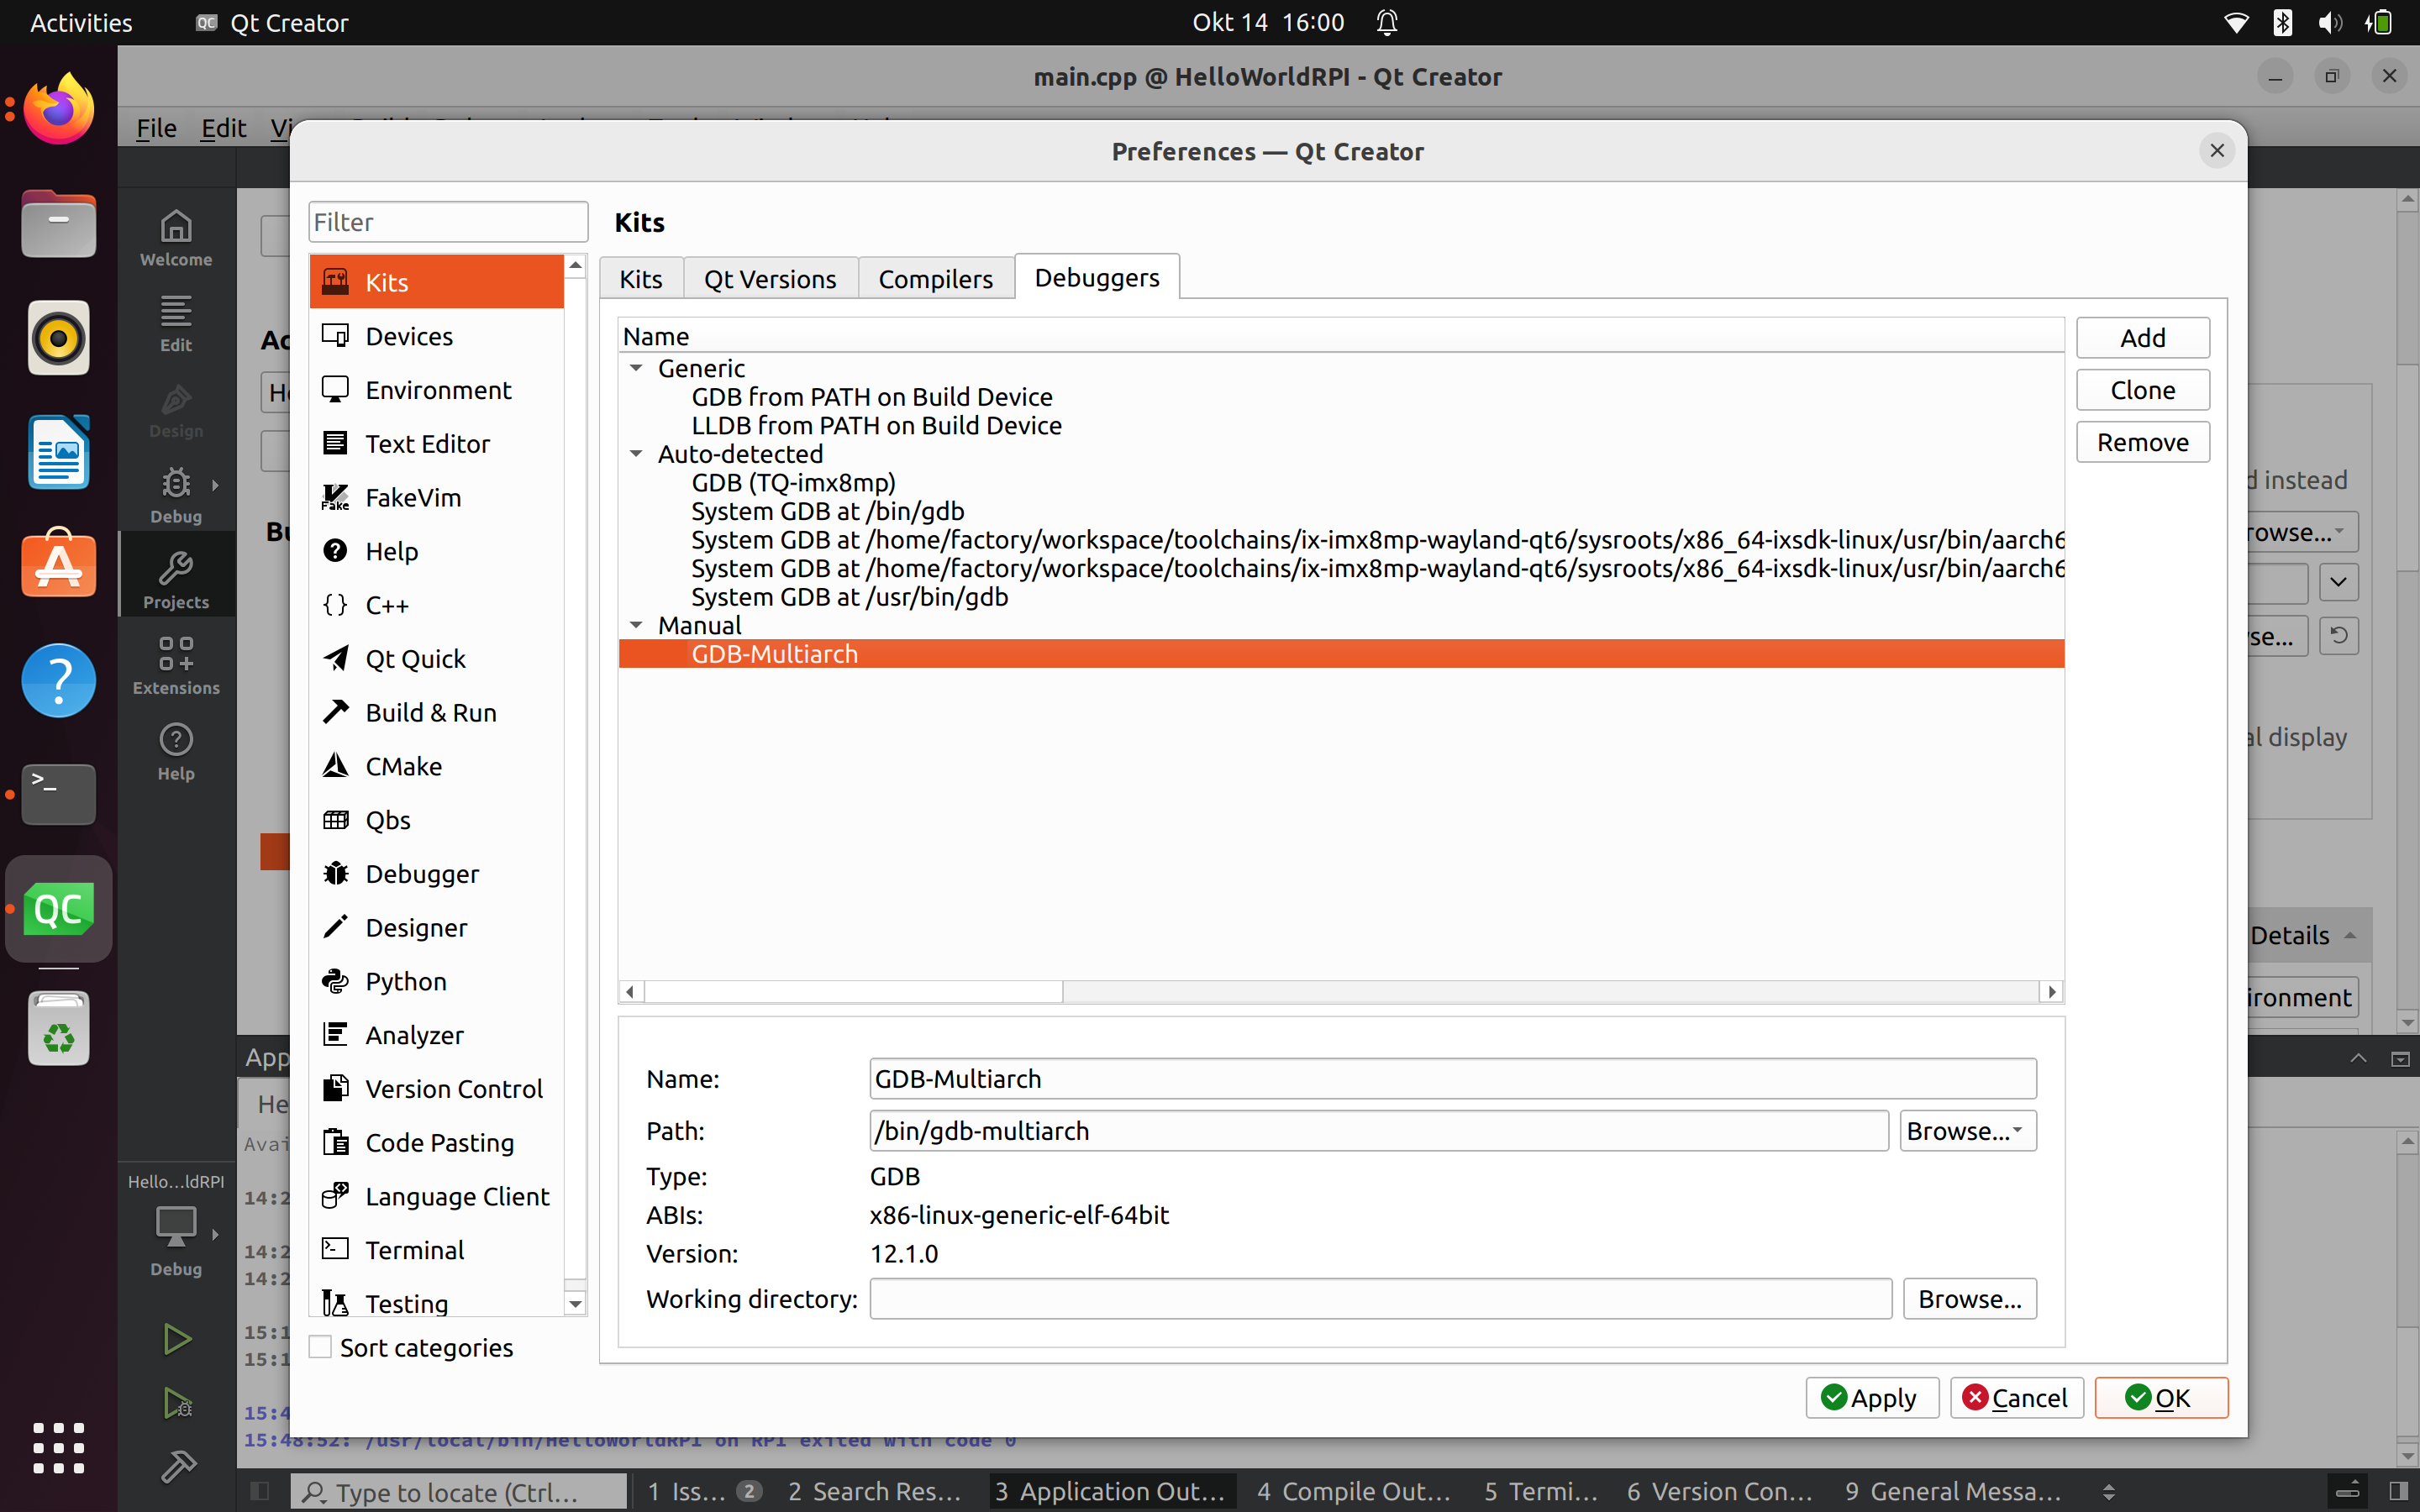
Mag-set up ng mga Device
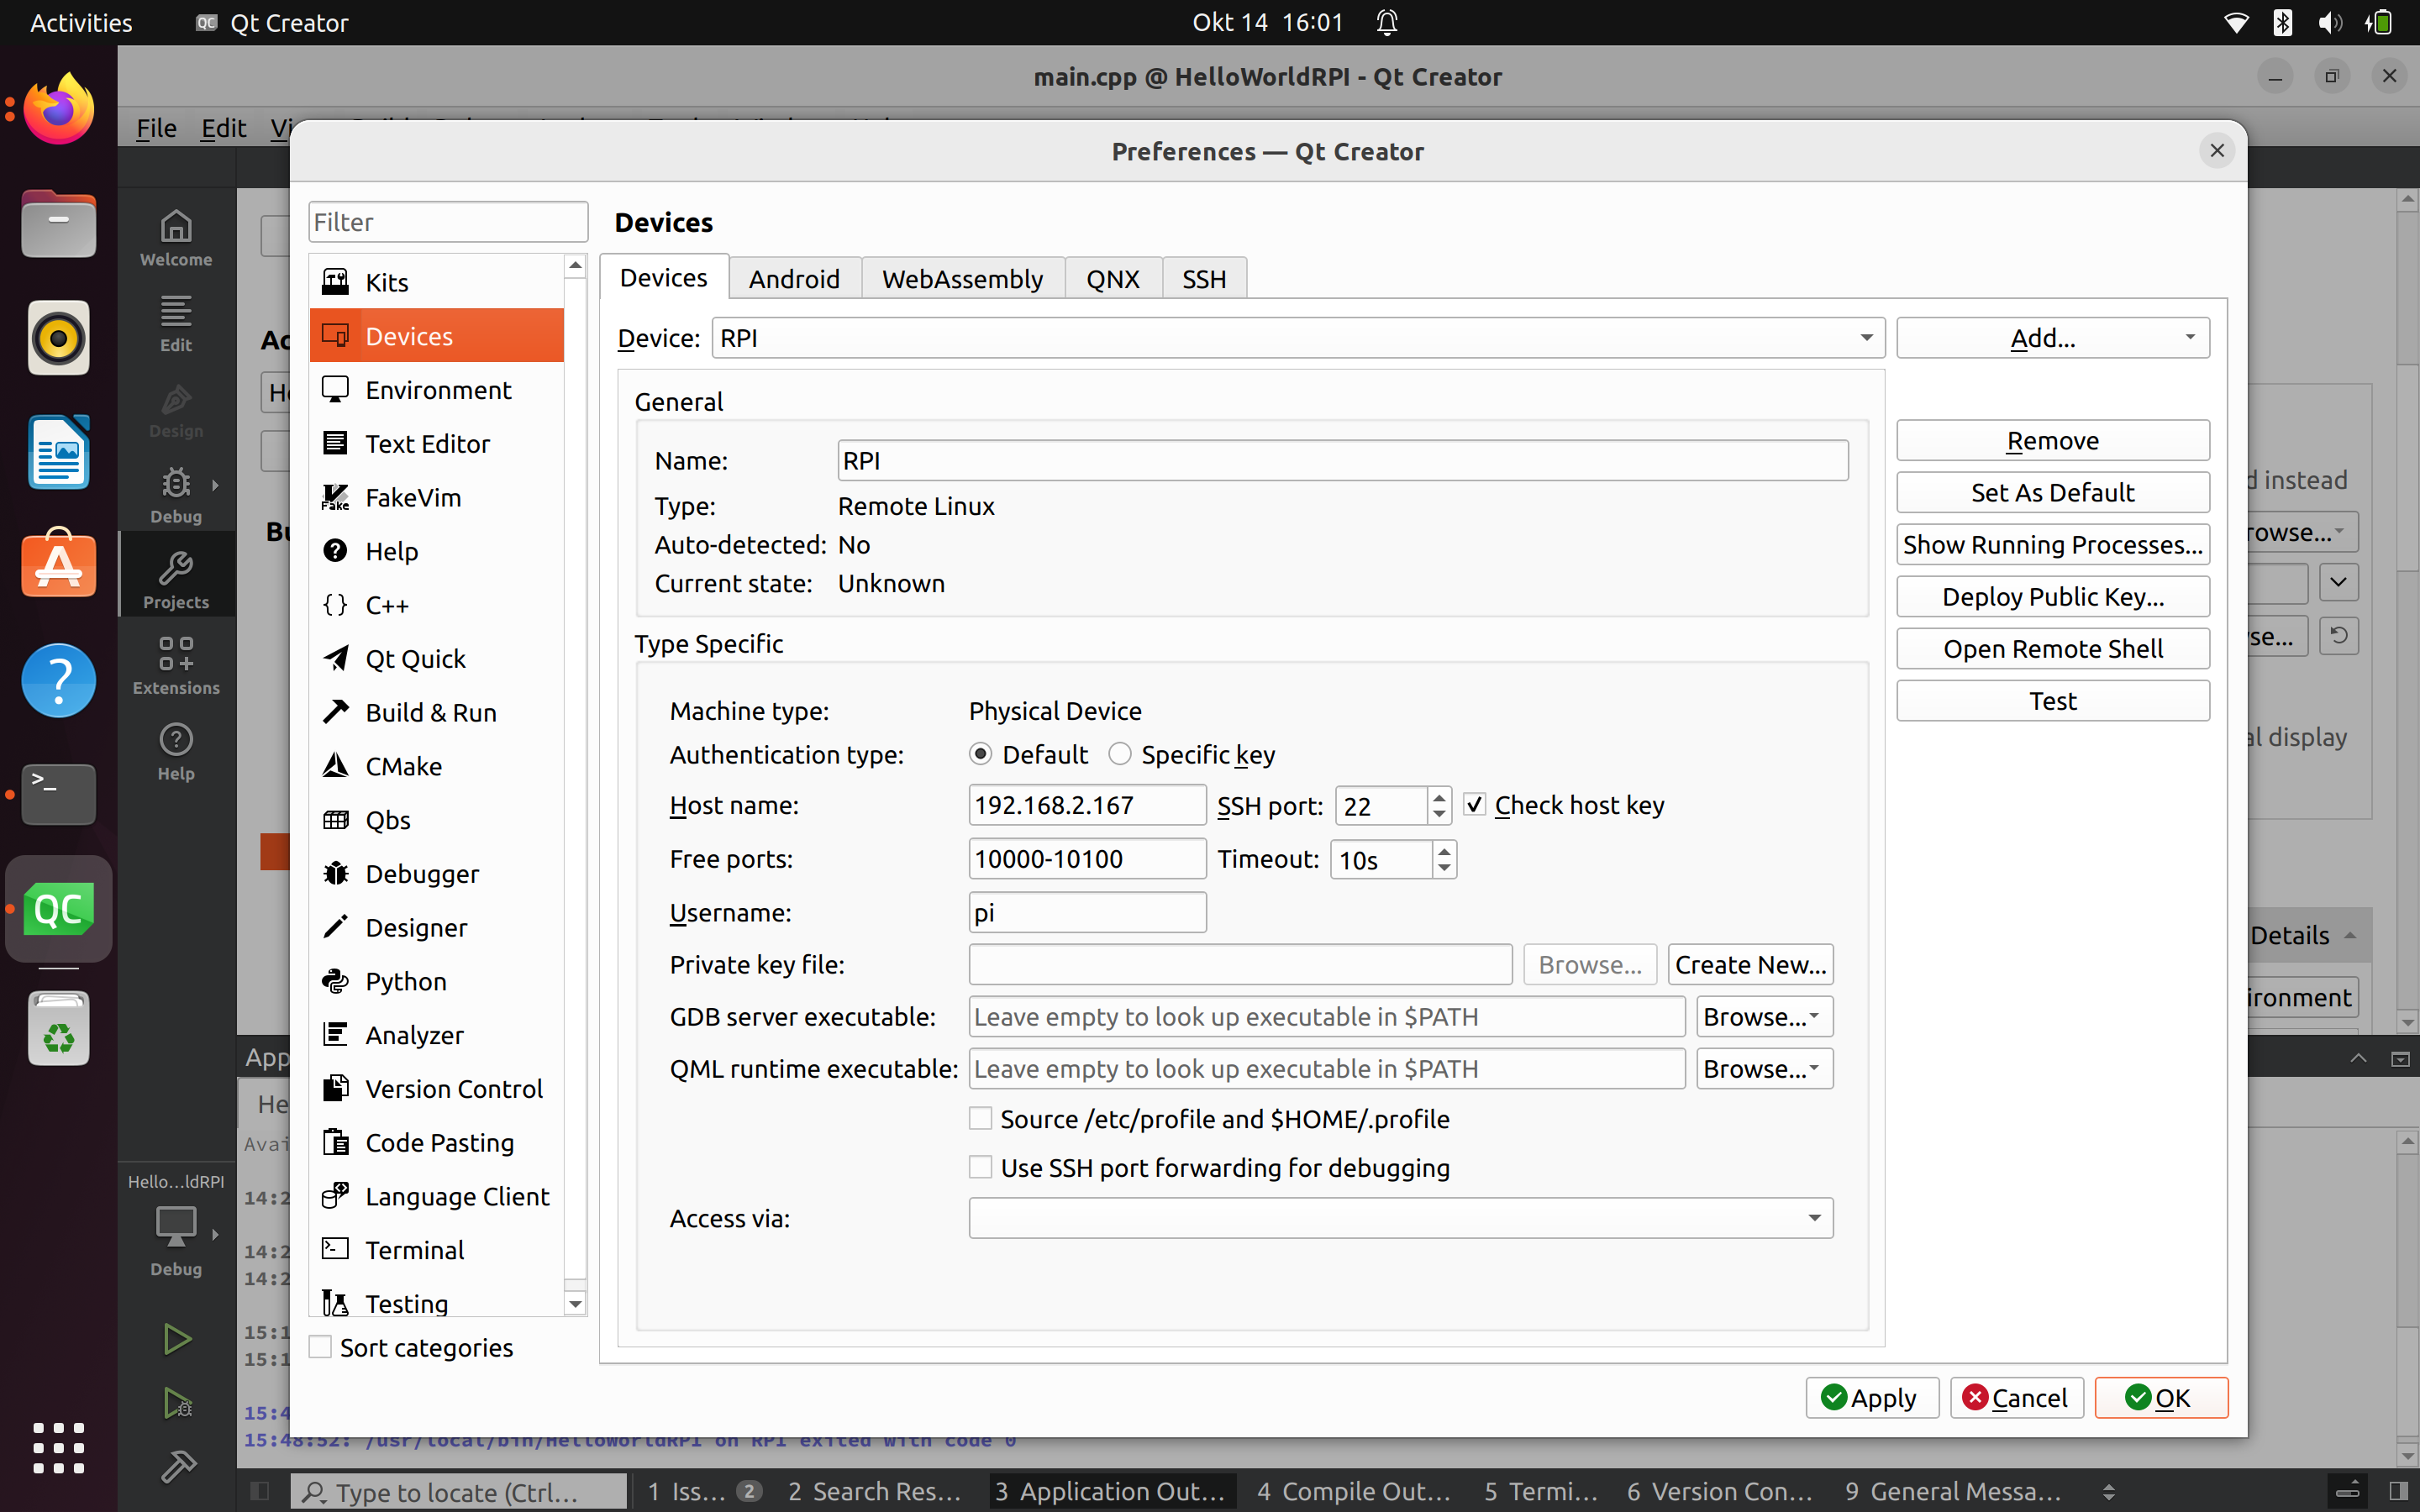
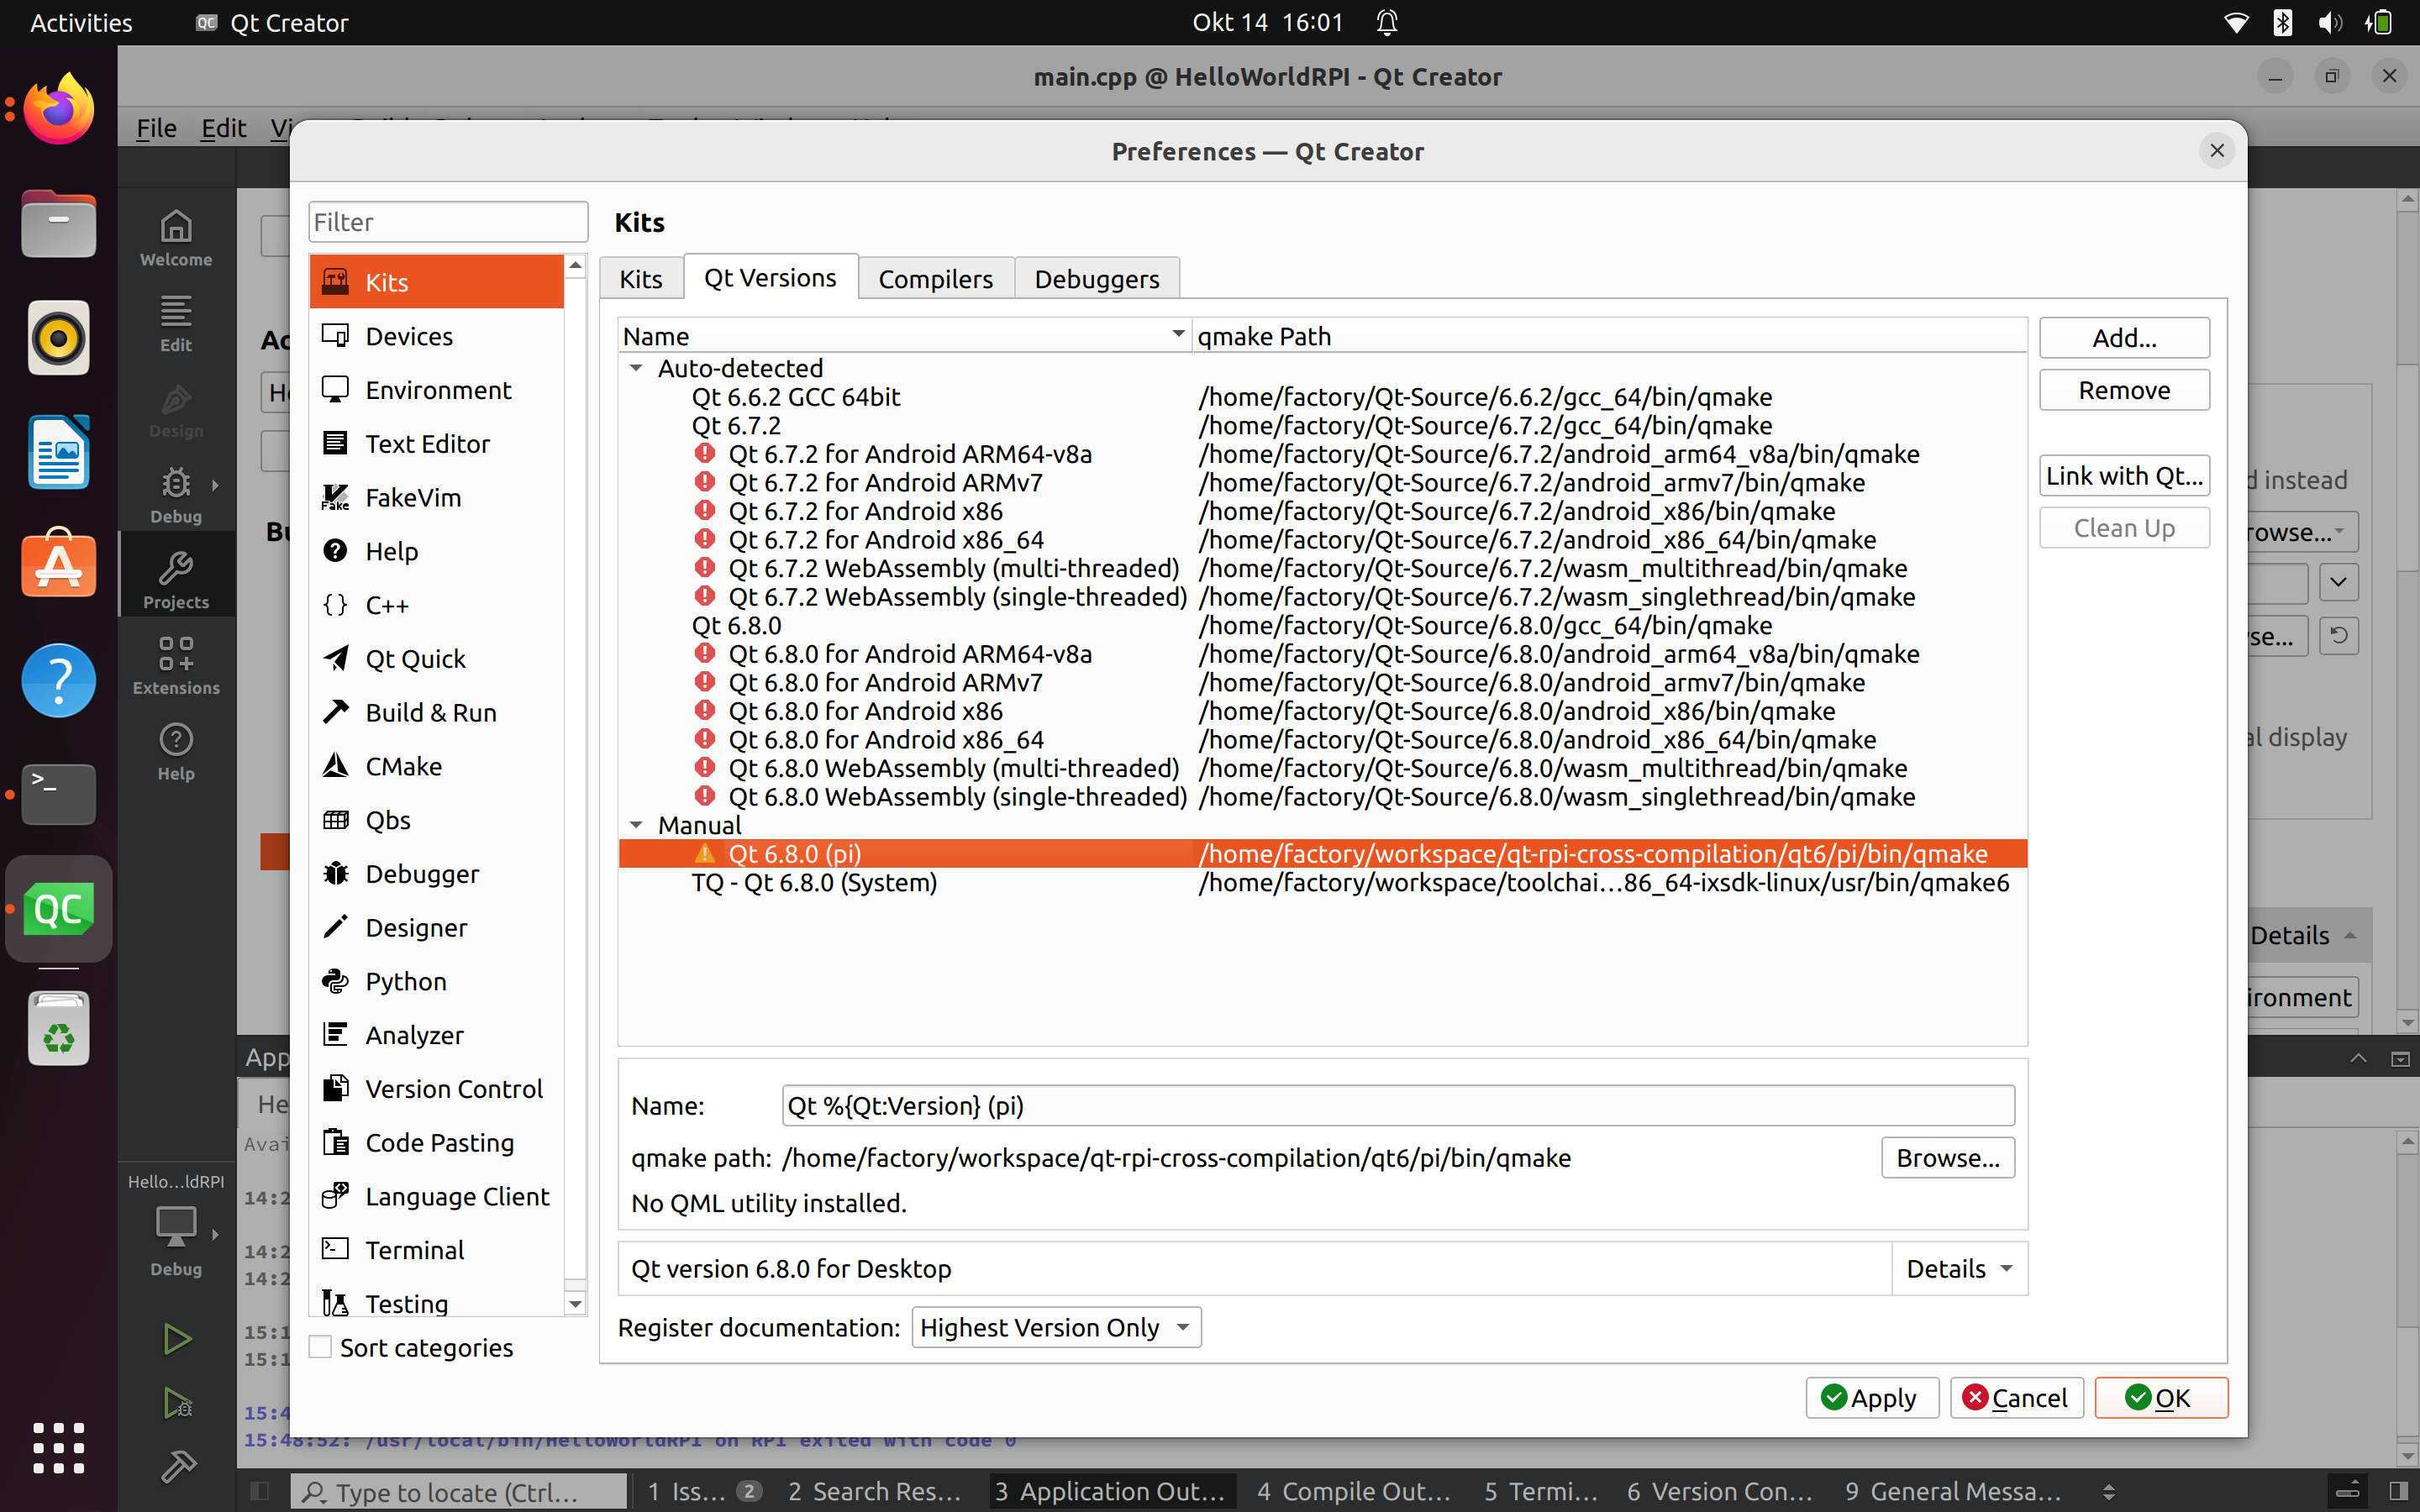
Subukan ang koneksyon sa pindutan ng "Test"Mag-set up ng Qt Versions
Mag-set up ng mga Kit
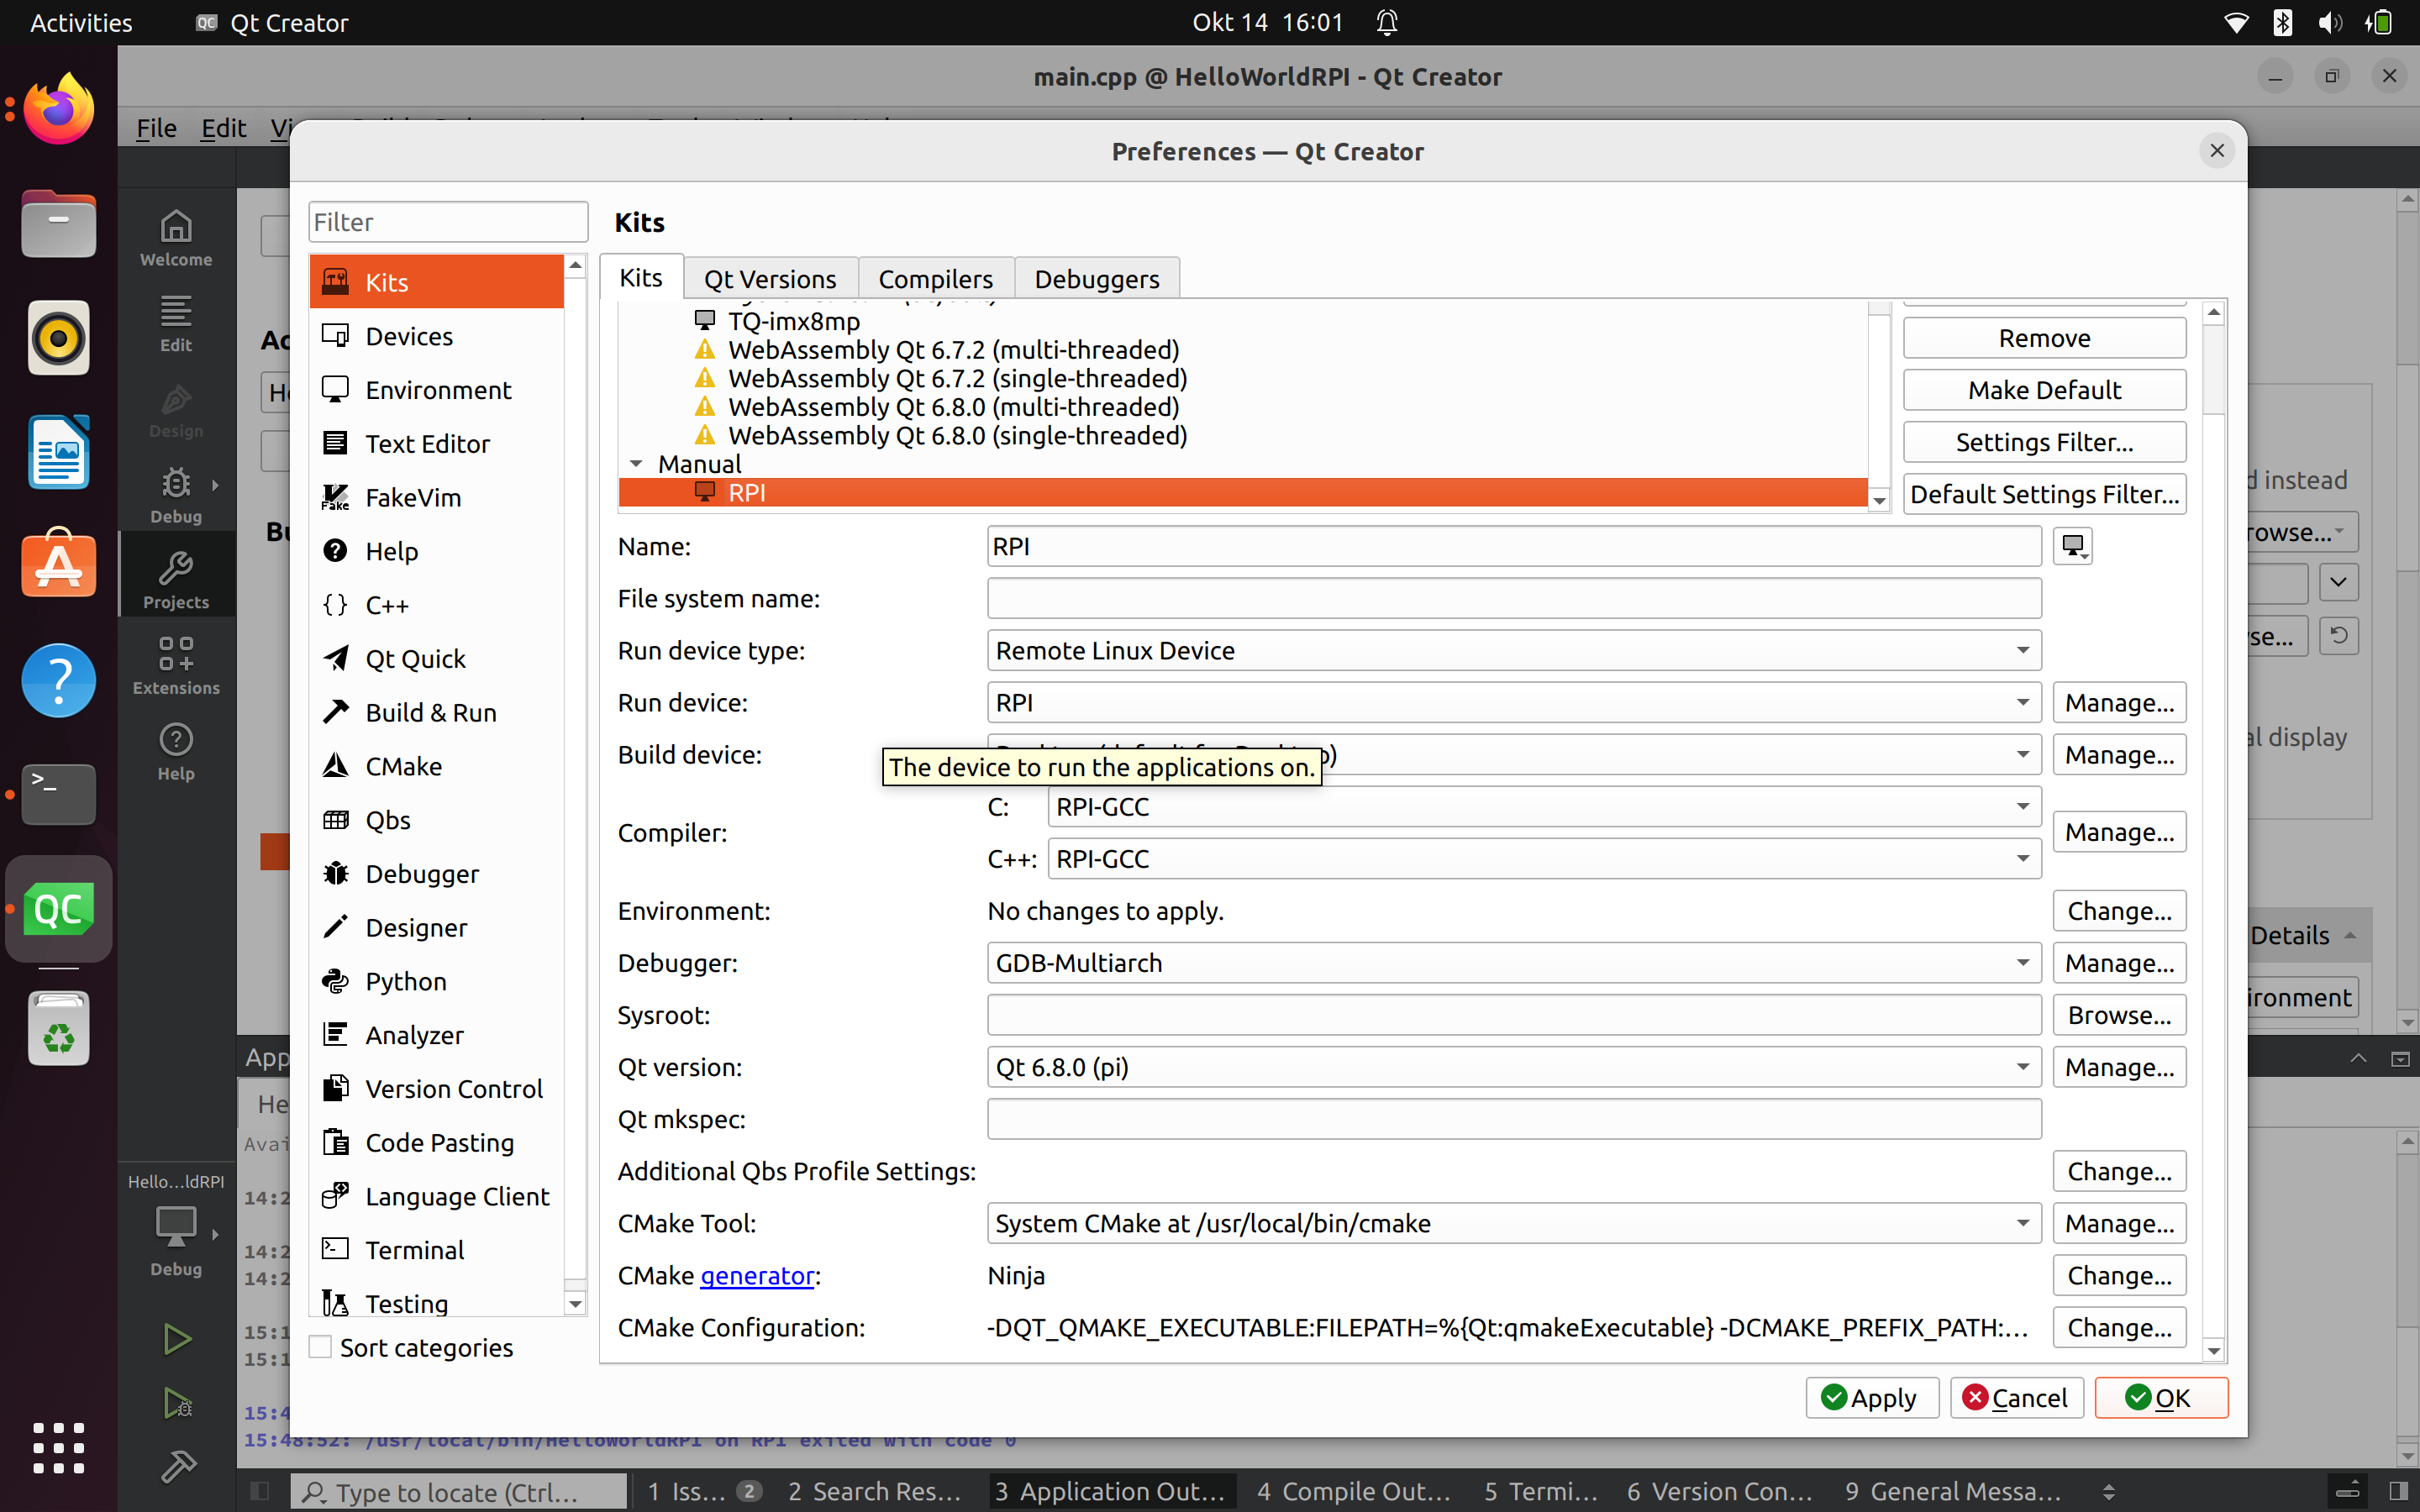
Sa "CMake Configuration" i-click ang Baguhin at magdagdag ng mga follow command.
-DCMAKE_TOOLCHAIN_FILE:UNINITIALIZED=/home/pmy/qt6/pi/lib/cmake/Qt6/qt.toolchain.cmakeMga setting ng QtCreator Projects
Kung lumikha ka ng isang proyekto sa QtCreator, kailangan mong ayusin ang configuration ng "Run". Sa "Environment" kailangan mong idagdag:
-LD_LIBRARY_PATH=:/usr/local/qt6/lib/Magdagdag ng mga Submodule ng Qt
Magdagdag ng module ng QML
- Mag-download ng mga source code:
cd ~/workspace/qt-rpi-cross-compilation/qt6/src
wget https://download.qt.io/official_releases/qt/6.8/6.8.0/submodules/qtshadertools-everywhere-src-6.8.0.tar.xz
tar xf qtshadertools-everywhere-src-6.8.0.tar.xz
wget https://download.qt.io/official_releases/qt/6.8/6.8.0/submodules/qtdeclarative-everywhere-src-6.8.0.tar.xz
tar xf qtdeclarative-everywhere-src-6.8.0.tar.xz
Kailangan mong suriin ang mga dependency sa ~/workspace/qt-rpi-cross-compilation/qt6/src/qtdeclarative-everywhere-src-6.8.0/dependencies.yaml at ~/workspace/qt-rpi-cross-compilation/qt6/src/qtshadertools-everywhere-src-6.8.0/dependencies.yaml.
Siguraduhing dapat ay binuo at i install muna ang mga kinakailangang module.
- Buuin ang mga module para sa host.
cd ~/workspace/qt-rpi-cross-compilation/qt6/host-build
rm -rf *
$HOME/workspace/qt-rpi-cross-compilation/qt6/host/bin/qt-configure-module ../src/qtshadertools-everywhere-src-6.8.0
cmake --build . --parallel 8
cmake --install .
rm -rf *
$HOME/workspace/qt-rpi-cross-compilation/qt6/host/bin/qt-configure-module ../src/qtdeclarative-everywhere-src-6.8.0
cmake --build . --parallel 8
cmake --install .- Bumuo ng mga module para sa rpi
cd ~/workspace/qt-rpi-cross-compilation/qt6/pi-build
rm -rf *
$HOME/workspace/qt-rpi-cross-compilation/qt6/pi/bin/qt-configure-module ../src/qtshadertools-everywhere-src-6.8.0
cmake --build . --parallel 8
cmake --install .
rm -rf *
$HOME/workspace/qt-rpi-cross-compilation/qt6/pi/bin/qt-configure-module ../src/qtdeclarative-everywhere-src-6.8.0
cmake --build . --parallel 8
cmake --install .- Ipadala ang mga binary sa rpi.
rsync -avz --rsync-path="sudo rsync" $HOME/workspace/qt-rpi-cross-compilation/qt6/pi/* pi@192.168.2.167:/usr/local/qt6Mga Pagkilala
Mga pinagkukunan na ginamit sa paglikha ng Tagubilin na ito:
- https://wiki.qt.io/Cross-Compile_Qt_6_for_Raspberry_Pi
- https://github.com/MuyePan/CrossCompileQtForRpi
Salamat sa lahat.
